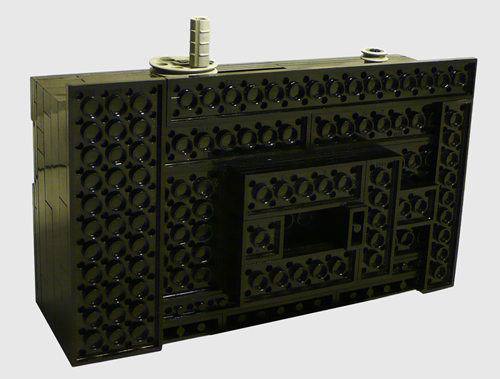
For my first post of seanstimac.com, version 2.0 I thought I’d start by showing off the 35mm pinhole lego camera that I made last Fall/Winter. Except for some electrical tape to patch up light leaks, it is made completely out lego pieces. It took me three prototypes before this one came along and functioned well. I first read about DIY lego cameras about a year ago at Adrian Hanft’s site, Found Photography.

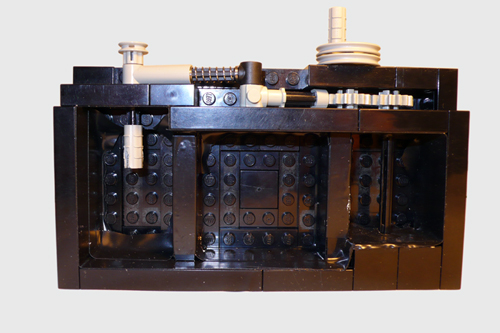
My mechanism for preventing back spooling is also a fantastic improvement. It is spring loaded and fits tightly against the winding knob’s sprocket. Like his, mine also clicks, which allows you determine which frame you’re on. To rewind the film you pull the spring back and begin turning the rewind knob (you don’t have to hold the spring until the film is totally rewound, once the spring has been disengaged you can rewind freely).

I had to modify three pieces to make this camera work. You can see each of them in the photo above. The first one is the grey piece in the first compartment. It is the piece that allows me to rewind the film and hold the film cassette in place. The second piece is in the center compartment, the pinhole. It is made from a lego part. It is a thin four bump square with a tiny hole poked in it with a needle. The third modified piece is an older part. It is the spool that you wind the exposed film onto. I had to cut the center out of it so that it would catch and wind the film. I broke three of these trying to make this part, the plastic is so brittle.
My lego camera does not use a film mask. The closest thing I have to film mask is wall that separates the three back compartments of the camera. It is a wide angle pinhole, I get about 20 exposures on 36 exposure roll. All said and done, it took me a few weeks to come up with a working model. It was loads of fun to make because it made me use my brain and I got to pull out my legos and play for a few weeks.
![[del.icio.us]](http://thephotoplayground.com/wp-content/plugins/bookmarkify/delicious.png)
![[Digg]](http://thephotoplayground.com/wp-content/plugins/bookmarkify/digg.png)
![[Facebook]](http://thephotoplayground.com/wp-content/plugins/bookmarkify/facebook.png)
![[Furl]](http://thephotoplayground.com/wp-content/plugins/bookmarkify/furl.png)
![[Google]](http://thephotoplayground.com/wp-content/plugins/bookmarkify/google.png)
![[LinkedIn]](http://thephotoplayground.com/wp-content/plugins/bookmarkify/linkedin.png)
![[Reddit]](http://thephotoplayground.com/wp-content/plugins/bookmarkify/reddit.png)
![[StumbleUpon]](http://thephotoplayground.com/wp-content/plugins/bookmarkify/stumbleupon.png)
![[Technorati]](http://thephotoplayground.com/wp-content/plugins/bookmarkify/technorati.png)
![[Twitter]](http://thephotoplayground.com/wp-content/plugins/bookmarkify/twitter.png)
![[Email]](http://thephotoplayground.com/wp-content/plugins/bookmarkify/email.png)


